Master the Aeropress Espresso: A Guide for Coffee Lovers
As an Amazon Associate, I earn from qualifying purchases, at no additional cost to you. Disclaimer
Introduction to Aeropress Espresso
Hello fellow coffee enthusiasts! Have you ever wondered how to make a delicious, aromatic espresso without a fancy, expensive machine? If so, you’re in the right place. Let’s talk about brewing an espresso using an Aeropress. Brewing an Aeropress espresso is simpler than you think. And once you get the hang of it, you’ll find yourself making your own espresso more often than not. Let me take you through this process step by step.
What is an Aeropress?
An Aeropress is a handy, compact coffee maker that looks like a large plastic syringe. It was invented by Alan Adler, a Stanford University mechanical engineering lecturer. The Aeropress has since taken the world of coffee brewing by storm. An Aeropress is a versatile and unique brewing device that combines several elements of other brewing methods, creating a brewing experience that’s one-of-a-kind. Although relatively new to the coffee scene, the Aeropress has rapidly gained popularity due to its simplicity, compact size, affordability, and the fantastic quality of coffee it produces.
Physically, an Aeropress is a compact, cylindrical device made primarily of durable plastic. Its innovative design makes it resistant to breaking, which is an excellent advantage over traditional glass or ceramic coffee makers. This sturdiness, combined with its lightweight structure, makes the Aeropress a favorite among travelers and outdoor enthusiasts. You can easily pack it into a backpack or a suitcase, allowing you to enjoy a quality coffee wherever you go.
How an Aeropress Works
The device consists of three main parts: a brewing chamber, a plunger, and a filter cap. The brewing chamber and plunger work together much like a syringe. Coffee grounds and hot water are mixed in the brewing chamber, then the plunger is used to press the mixture through a paper or metal filter in the filter cap, directly into a cup or mug. This technique provides a quick and efficient method of extraction, resulting in a smooth, flavorful coffee that’s lower in acidity and bitterness compared to other brewing methods.
One of the key features of the Aeropress is its versatility. With an Aeropress, you can brew a wide range of coffee styles, from a single cup of filter-style coffee to a concentrated espresso-like brew. This adaptability has led to a global community of Aeropress enthusiasts, who enjoy experimenting with different techniques, coffee varieties, grind sizes, and brew times to create their perfect cup.
In short, the Aeropress is a unique, ingenious coffee brewing system that offers a simple yet effective way of producing excellent quality coffee, providing an ideal brewing solution that caters to both coffee newcomers and seasoned coffee aficionados alike.
The Essentials of Aeropress Espresso Brewing
When you’re brewing coffee with an Aeropress, you’re in for an exciting experience. This is about more than just creating a cup of coffee – it’s about the journey to craft your perfect brew. And for that, you’ll need the right essentials. Here’s a detailed look at the equipment and ingredients you’ll need:
The Aeropress Kit
An Aeropress kit comes with everything you need to start brewing right away: the Aeropress itself, a year’s worth of microfilters, a coffee scoop, a stirrer, and a funnel. The brewer includes the chamber and plunger, which work together to press hot water through the coffee grounds.
Coffee Beans
The quality of your coffee beans will significantly affect your espresso’s flavor. It’s best to use freshly roasted beans from a trusted local roastery. When it comes to choosing a type of bean, there’s a world of flavors to explore. Whether you prefer fruity African beans or chocolatey South American varieties, feel free to experiment and find what you like best.
Coffee Grinder
While you can buy pre-ground coffee, nothing beats the flavor of coffee made from freshly ground beans. Coffee grinders come in two types: blade grinders and burr grinders. Burr grinders are generally preferred as they grind coffee to a consistent size. The Aeropress works well with a medium-fine grind – slightly finer than table salt.
Digital Scale
Precision is key when making espresso with an Aeropress. A digital scale can help you accurately measure your coffee and water to ensure a consistent brew every time.
Water Kettle
You’ll need hot water for brewing. Any kettle will do, but an electric kettle with a built-in thermometer will give you more control over the water temperature. Aim for water that’s around 85-95 degrees Celsius (185-205 degrees Fahrenheit).
Aeropress Filters
Aeropress coffee makers can use either paper or metal filters. Paper filters are disposable and result in a clean cup of coffee with very little sediment. Metal filters are reusable and often produce a slightly richer flavor with more oils.
Timer
Timing is crucial in the Aeropress brewing process. While you can use a stopwatch or the clock on your phone, a dedicated coffee timer can also be a valuable tool.
Sturdy Mug or Carafe
Lastly, you’ll need a sturdy mug or carafe to press your coffee into. Make sure it’s wide enough to fit the Aeropress and stable enough not to tip over during the pressing process.
With these essentials, you’ll be well-equipped to start your journey into Aeropress brewing, offering you the tools to experiment, adjust, and ultimately craft your perfect cup of coffee.
Step-by-step Guide to Brewing Aeropress Espresso
Armed with the knowledge of what you need, it’s time to walk you through the brewing process. The beautiful thing about Aeropress is the simplicity and speed of its brewing process. Let’s dive into the details:
1. Heat Your Water
First, you’ll need to heat your water. The ideal temperature for brewing coffee is typically around 85-95 degrees Celsius (185-205 degrees Fahrenheit). If your kettle doesn’t have a built-in thermometer, a good rule of thumb is to let the water sit for about 30 seconds to 1 minute after it comes to a boil.
2. Grind Your Coffee
While your water is heating, grind your coffee beans. For the Aeropress, a medium-fine grind is recommended. This is a bit finer than sea salt. If you’re using a scale, measure out about 18-20 grams of coffee.
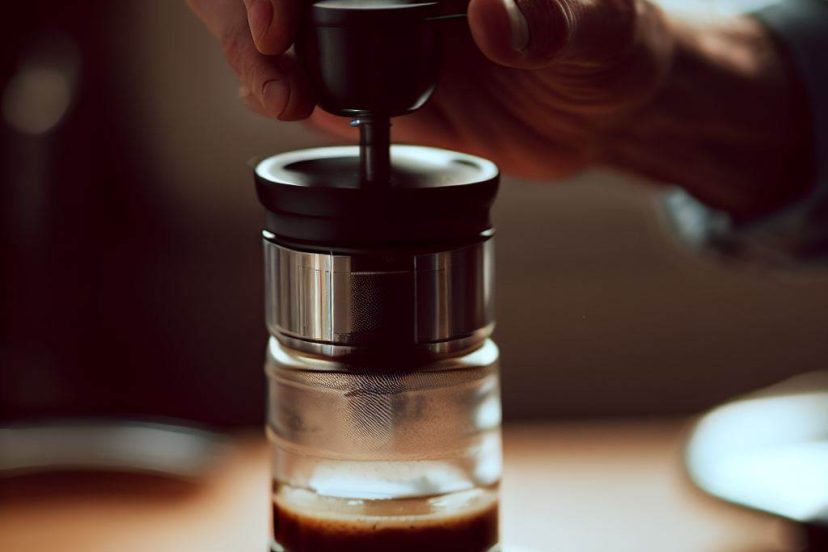
3. Prepare Your Aeropress
Place a paper filter in the filter cap and pre-wet it to get rid of any paper flavor. Then, attach the cap to the brewing chamber. This step helps to ensure that your filter will stay in place during brewing. Place the chamber on top of a sturdy mug or carafe.
4. Add Coffee
Pour your ground coffee into the brewing chamber. Use the funnel included in your Aeropress kit to avoid spilling any grounds.
5. Add Water
Start your timer as soon as you begin adding water. For this recipe, you’ll add water up to the ‘2’ or ‘3’ mark on the Aeropress chamber, depending on how strong you like your espresso. Make sure all the coffee grounds are submerged.
6. Stir and Steep
Give the coffee a gentle stir with the Aeropress stirrer or a spoon to ensure all the coffee grounds are fully saturated. Then, let the coffee steep. If you’re aiming for a strong, espresso-like brew, a 1-minute steep time is sufficient.
7. Insert the Plunger and Press
After the coffee has steeped, insert the plunger into the chamber. Hold the Aeropress firmly in place and press down on the plunger slowly and steadily. The pressing process should take about 20-30 seconds. You’ll know you’re done when you hear a hissing sound – this indicates that all the water has been pushed through the coffee grounds.
8. Enjoy Your Aeropress Espresso
Congratulations! You’ve just made a delicious, rich, and smooth espresso-like coffee with your Aeropress. You can enjoy it as is, or add hot water or milk to make an Americano or latte.
Remember, the beauty of Aeropress is its versatility, so feel free to adjust any part of this process to suit your taste. More coffee or a finer grind will make a stronger brew, while less coffee or a coarser grind will make a lighter one. Play around with it and have fun until you find your perfect recipe!
Tips for a Perfect Aeropress Espresso
Brewing coffee with an Aeropress is a relatively straightforward process, but mastering the art can take some time. Here are some tips that will help you elevate your Aeropress espresso to the next level:
Always Use Fresh Coffee
Coffee beans are at their best within a few weeks of being roasted, and a few minutes of being ground. Always buy freshly roasted beans and grind them right before you’re ready to brew. This will give you the most vibrant flavors.
Experiment with Water Temperature
While the generally recommended water temperature for brewing coffee is 85-95 degrees Celsius (185-205 degrees Fahrenheit), you may prefer your coffee brewed at a slightly higher or lower temperature. Don’t be afraid to experiment to find your ideal temperature.
Adjust Your Coffee-to-Water Ratio
Different people prefer different strengths of coffee. If you find your espresso too strong or too weak, adjust the amount of coffee you use. A good starting point is 18-20 grams of coffee per 8 ounces of water, but you may prefer more or less.
Explore Different Aeropress Espresso Coffee Beans
There’s a whole world of coffee flavors out there. Don’t limit yourself to just one kind of bean. Try beans from different countries, processed in different ways, and roasted to different levels. You might be surprised at what you discover.
Play with Grind Sizes
The grind size can drastically affect the taste of your coffee. Generally, a medium-fine grind is recommended for Aeropress, but feel free to try a slightly coarser or finer grind to see how it changes the flavor.
Clean Your Aeropress Regularly
Coffee can leave behind oils that build up over time and affect the taste of your brew. Make sure to clean your Aeropress regularly to keep your coffee tasting fresh.
Pro Tip: Try the Aeropress Espresso Inverted Method
This is a popular alternative brewing method among Aeropress enthusiasts. Instead of placing the Aeropress right side up, you flip it upside down, add your coffee and water, steep, then flip it back over to press. This method allows for a longer steep time and can give you a more robust flavor.
Benefits of Using Aeropress for Espresso
If you’re an espresso lover, you may be wondering what sets the Aeropress apart from other espresso makers. Here are some significant benefits of using an Aeropress for brewing your espresso:
1. Ease of Use
The Aeropress has a relatively simple design and brewing process, making it user-friendly, even for coffee brewing novices. The steps are straightforward, and there is a lot of room for error, making it a perfect tool for beginners and experts alike.
2. Quick Brew Time
The Aeropress brews coffee in just a few minutes, making it one of the fastest hand brewing methods available. It’s perfect for those busy mornings when you need a quick caffeine fix without compromising on quality.
3. Versatility
One of the most significant advantages of the Aeropress is its versatility. You can adjust the coffee-to-water ratio, brewing time, and temperature to achieve a range of flavors and strengths, from a full-bodied espresso to a lighter, smoother coffee. You can even use it to make cold brew!
4. Portability
The Aeropress is compact, lightweight, and durable, making it an excellent device for travel or outdoor activities like camping. As long as you have access to hot water, you can make a great cup of coffee anywhere.
5. Affordable
In comparison to other coffee brewing equipment, especially traditional espresso machines, the Aeropress is quite affordable. It offers a cost-effective way to brew high-quality espresso at home.
6. Easy Cleanup
The Aeropress is easy to clean up. After brewing, all you need to do is remove the filter cap, push the coffee grounds out by continuing to plunge, and rinse the components. There are no intricate parts to deal with, making the cleaning process fast and straightforward.
7. Aeropress Espresso has a Smooth Taste
Due to its unique brewing process, the Aeropress often results in a smooth, rich flavor with low acidity and bitterness. It’s known for producing clean, pure, and flavorful coffee.
Whether you’re an experienced barista or new to the world of home-brewed espresso, the Aeropress offers an accessible and flexible way to create a delicious cup of coffee, tailored to your personal preferences.
Conclusion
So there you have it – a step-by-step guide to making a delightful cup of Aeropress espresso. It might take a few tries to get it perfect, but once you do, I guarantee you’ll love the results.
Now go forth and brew!
Frequently Asked Questions (FAQs)
1. Can Aeropress really make espresso?
Yes, while it doesn’t make a traditional espresso, the Aeropress can make a strong coffee concentrate similar to espresso.
2. How long does it take to brew coffee with an Aeropress?
The entire process takes about 2-3 minutes, making it one of the fastest methods to brew coffee.
3. What grind size should I use for Aeropress?
A fine grind size, similar to table salt, is recommended for Aeropress brewing.
4. Why does my Aeropress coffee taste bitter?
Bitterness often results from over-extraction. Try using cooler water or a shorter brew time.
5. Can I use an Aeropress for regular coffee?
Absolutely! The Aeropress is versatile and can be used to brew both regular coffee and espresso-like brews.